How to Mail Merge from Google Sheets (2025)
Learn how to mail merge from Google Sheets and send personalized emails in bulk with ease. Follow our step-by-step guide to automate your Gmail campaigns in minutes!
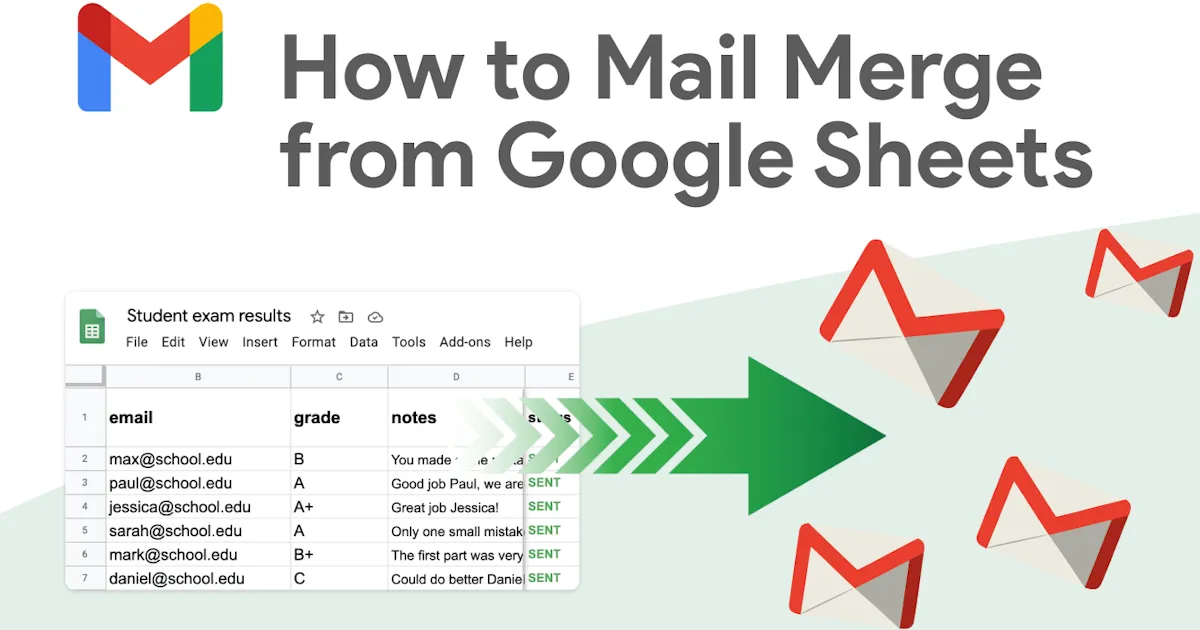
Good news: mail merge with Google Sheets allows you to send personalized emails in bulk with just a few clicks !
In this guide, we will walk you through the process of mastering mail merge with Google Sheets. And you’ll see it’s not that complicated… as long as you use the right method!
Overall :
-
Install Mail Merge for Gmail from the Google Workspace Marketplace.
-
Prepare your Google Sheet.
-
Use dynamic tags : they’re auto-generated from your sheet.
-
Draft your email template in the editor.
-
Send your campaign and let the add-on do the work.
What is mail merge and why use it?
Mail merge enables you to send mass personalized emails by combining an email template with a dataset.
Essentially, the email template contains dynamic placeholders like {{FirstName}} or {{Company}}, which are automatically replaced with actual data from your Google Sheets spreadsheet.
Mail merge is a powerful automation tool that helps:
-
Save time by avoiding manual email sending
-
Improve email personalization and increase recipient engagement.
⚡ Bonus! The high level of personalization makes mail merge an excellent fit for cold emailing as well.
Method #1: Use an add-on for Gmail or Google Sheets
This is the perfect opportunity to introduce our add-on, Mail Merge for Gmail! Using it is truly a breeze.
Step 1 : Install Mail Merge for Gmail from Google Workspace Marketplace.
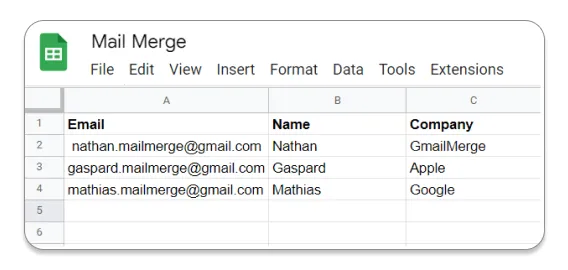
Step 2 : Fill in your Google Sheets content. Each row represents an email. The minimum requirement to send a campaign is to have a column with all recipient names. Add as many columns as needed.
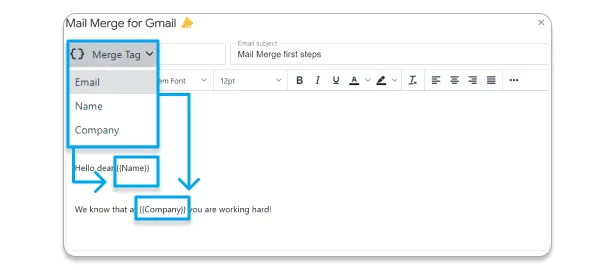
Step 3 : Modify the dynamic tags in the template editor. No need to write them manually, they are automatically generated from the data you entered in Google Sheets. No room for error!
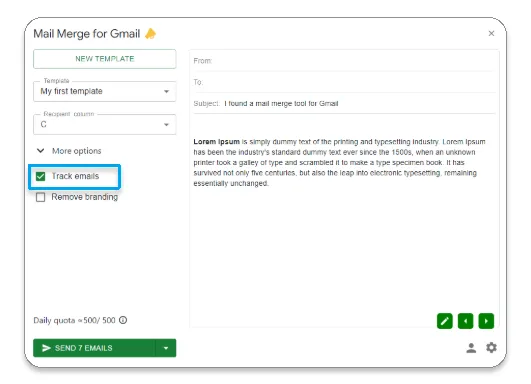
Step 4: Draft your mail merge email template.
Step 5 : Send your campaign.
Step 6 : Track and Optimize. To enable tracking, simply check “Track emails” in the add-on.
💡We have created a short and precise video to explain the basics of mail merge with Gmail and Google Sheets.
Method #2: use Google’s Mail Merge script
What does Google offer?
Google provides a native mail merge solution via Google Apps Script , a scripting language integrated into Google Sheets. This method eliminates the need for third-party extensions.
But… there’s a catch! This method is quite complex if you’re not familiar with coding. Plus, it’s time-consuming.
✅ Advantages:
-
Free
-
No need to install an extension
-
More flexibility by writing custom code
-
Native integration with Google’s ecosystem ( Gmail, Google Sheets)
❌ Disadvantages:
-
Requires coding knowledge (Google Apps Script).
-
No advanced graphical interface: no message preview, and using rich HTML templates requires manual HTML coding.
-
No advanced email tracking: you can’t see who opened the email, clicked a link, or replied. No automatic handling of unsubscribes or invalid emails.
-
No automatic CRM integration with platforms like HubSpot, Salesforce, or Zoho CRM.
How to use it ?
Here are the steps to use Google’s mail merge script:
1️⃣ Prepare Your Google Sheets Spreadsheet
Create a new Google Sheets file.
Add columns with recipient information (e.g., First Name, Last Name, Email, Message).
Fill in the sheet with contact data.
2️⃣ Write an Email Template in Gmail
Open Gmail and click “Compose.”
Draft your message, including dynamic placeholders (e.g., {{FirstName}}).
Save it as a draft but do not send it.
3️⃣ Add and Run the Apps Script
In Google Sheets, go to Extensions > Apps Script.
Copy and paste the script provided by Google into the Apps Script editor (Official script link) and customize it.
Click “Run” to execute the mail merge.
4️⃣ Verify and Send Emails
The script will send emails based on the data in your Google Sheets.
Google Sheets will display a confirmation of sent emails.
Not convinced? Neither are we. That’s why we created the Mail Merge for Gmail extension.
Method #3: Use a Google Chrome Extension
A Chrome extension works directly inside Gmail. meaning it adds new buttons and features to the Gmail interface.
⭐ By the way, our tool Mail Merge for Gmail will soon be available as a Chrome extension!
There are several Chrome extensions for mail merge with Google Sheets. GMass and Mailmeteor are among the most popular. We’ve also written articles about these options here and here.
Step 1: Install the extension :
-
Open Google Chrome.
-
Go to the Chrome Web Store: chrome.google.com/webstore.
-
Search for the extension of your choice.
-
Click Add to Chrome → Add extension.
-
You’ll then see a new icon or button appear in your browser / Gmail.

Step 2: Prepare your Google Sheets file.
Step 3: Write your email template in Gmail:
-
Draft your email.
-
Use placeholders inside {{ }} that match the column names in your Google Sheets.
Step 4: Connect your Google Sheet to Gmail via the extension:
-
In your Gmail window (whether your draft is open or not), you’ll now see a special button added by the extension.
-
Click it.
-
Select the Google Sheet that contains your data.
Step 5: Configure the sending options.
Step 6: Launch the mail merge.
Method #4: Use Mail Merge in Gmail
We present this method last because it’s not for everyone: it only applies to users with a paid Google Workspace account. Free personal Gmail accounts (those ending in @gmail.com without a Workspace subscription) do not have access.
👉 We’ve detailed the pros and cons of this method here.
Step 1: Activate Mail Merge mode:
-
Open Gmail.
-
Click Compose.
-
In the compose window, hover over the To field (recipients).
-
Click Mail Merge.
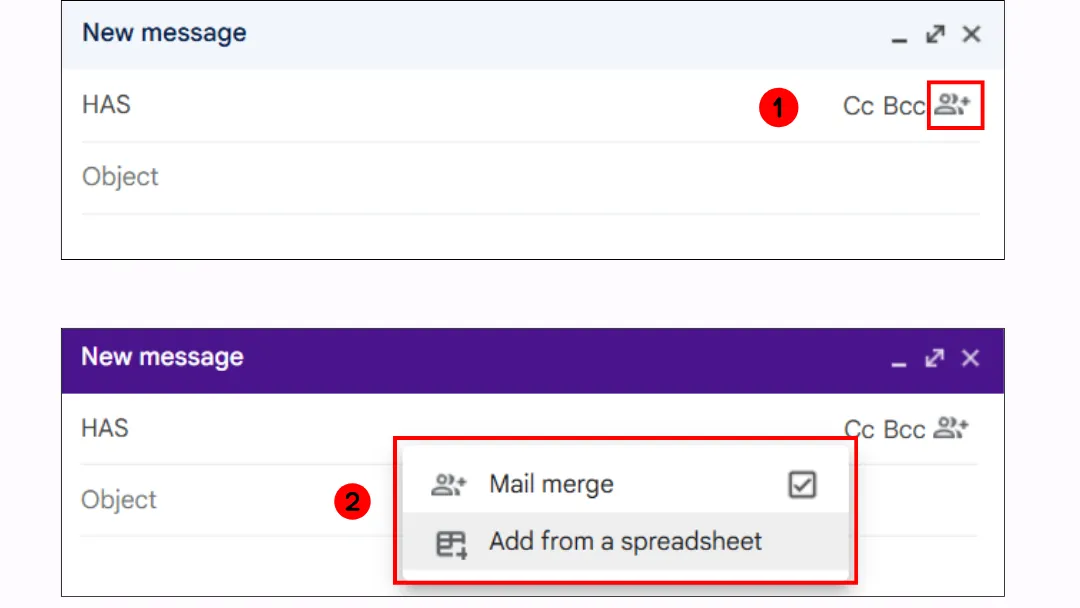
Step 2: Add recipients from a Google Sheet:
-
In the compose window → click Add from spreadsheet.
-
Select your Google Sheet containing your recipients and columns (e.g., First Name, Email, Amount, Product).
-
These columns can now be used as dynamic fields (@First name, @Product, etc.).
Step 3: Write your message with dynamic fields.
Example email:
Hello @First name,
Thank you for your purchase of @Product.
The total amount charged is @Amount.
Best regards,
The Support Team
➡️ Each placeholder will be automatically replaced with the data from your sheet.
Step 4: Review and send.
-
Click Continue.
-
Accept the terms of use.
-
Click Send.
Expert Insight: optimizing your Google Sheets for Mail Merge
Even the best tools won’t make up for poor data management. Not a fan of Google Sheets? Our goal is to show you just how practical it can be for mail merge. Here’s our proven method for structuring your data.
Define a clear column structure
Each column should have a specific role and a consistent naming convention to avoid confusion during mail merge.
👉 Quick Actions:
🔹 Add colors to headers to differentiate them from data.
🔹 Use header freezing (View > Freeze > 1 row) to keep them visible.
Apply email format validation
If an email address is entered incorrectly, Google Sheets will display an error message.
👉 Quick Actions:
-
Select the Email column.
-
Go to Data > Data Validation.
-
Choose Custom Formula and enter this rule: =REGEXMATCH(A1, ”^[a-zA-Z0-9._%+-]+@[a-zA-Z0-9.-]+.[a-zA-Z]{2,}$“)
Prevent duplicate emails
To avoid sending multiple messages to the same person, add conditional formatting :
Select the Email column.
Go to Format > Conditional Formatting.
Add a custom formula: =COUNTIF(C:C, C1)>1
Choose a highlight color (e.g., red for duplicates).
Why choose Mail Merge for Gmail?
⭐ Capterra overall rating: 4.8/5
Mail Merge for Gmail is a simple yet powerful extension that integrates directly with Gmail and Google Sheets. No complex tools are required!
For a more in-depth demonstration, check out:
-
Our article comparing the best cold emailing software,
-
User reviews on Capterra:
Made Life So Much Simpler
Overall: Revolutionized the way we do contact with customers and leads. Saves me so much time and I can now tell when people see my emails.
Pros:
-
Can manage large mailing lists and not trip up on accidentally mailing large groups with cc instead of bcc -Easy to see read receipts to see if someone read your emails -Able to send cc’ed emails to the same customer group but still customized -Easy to manage mailing lists.
-
Easy to add customized fields either through Gmail drafts or in the built in email template creator -Just the best -Very cheap monthly subscription to send a lot of emails -Can identify when you have your fields wrong -can do attachments, and a ton of them.
Cons: Can be a bit intimidating for first time users, but it’s pretty intuitive once you get going.
Switched From: Mailchimp
Reasons for Switching to Mail Merge for Gmail: Cheaper and easier than using Mailchimp with all their templates.
Here are its (many) advantages:
✔️ Intuitive and quick to use, ideal even for beginners.
✔️ Suitable for small teams and freelancers.
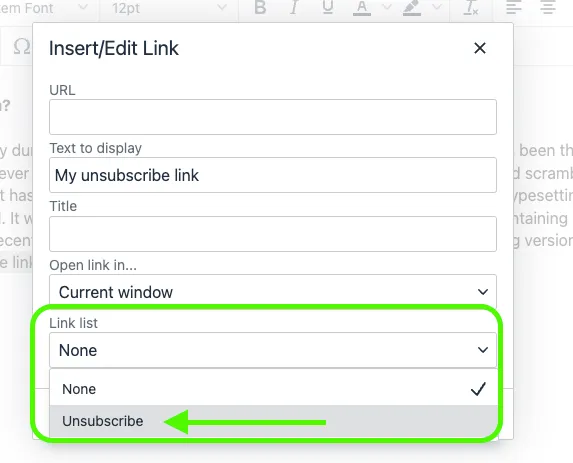
✔️ Flexible campaign management, allowing you to cancel an email send or include an unsubscribe link.
✔️ No data is shared with third parties.
✔️ Mail Merge cannot access your Gmail inbox or Google Sheets files.
✔️ Advanced security certifications, including CASA Tier 3 and ISO 27001.
✔️ Extremely reasonable pricing, even free options available.
Here are the essential features of this tool.
With Mail Merge for Gmail, you can design impactful and engaging emails enriched with images, emojis, links, and even attachments.
Another major advantage is its high level of personalization. By using dynamic fields , you can tailor each email to the recipient (name, company, etc.), while also customizing the sender and reply-to address for more targeted and professional communication.

Schedule your campaigns precisely by setting email delivery at the optimal time to maximize their impact. And that’s not all! You can also track email delivery in real time.
Mail Merge also provides handy tools to simplify campaign management. Pause an ongoing send if needed, insert an unsubscribe link to enhance user experience, or send a personalized email to multiple recipients with ease. Everything is designed to optimize your marketing strategy effortlessly.
Word of the end : With a well-structured spreadsheet and the right tools, you can prevent errors, save time, and improve the personalization of your messages.
Why make things complicated? Try Mail Merge for Gmail now and simplify your email campaigns in just a few clicks.
Try Mail Merge for Gmail for Free Here!
Any Questions ?
Can you do a mail merge from Google Sheets?
Yes. You can perform a mail merge from Google Sheets to send personalized emails in bulk. This can be done in several ways:
-
Using Google Workspace ’s native mail merge in Gmail (available on eligible accounts).
-
Installing a Google Sheets add-on (like YAMM, Mailmeteor, or Mail Merge for Gmail).
-
Using a Chrome extension (like GMass) connected to Gmail.
-
With an Apps Script (more technical but free).
How to mail merge labels from Google Sheets?
You can create labels from Google Sheets by using an add-on designed for labels, such as Avery Label Merge. Here’s how:
-
Prepare a Google Sheet with your data (names, addresses, etc.).
-
Go to Extensions > Add-ons > Get add-ons in Google Sheets.
-
Install Avery Label Merge (or a similar label merge add-on).
-
Open the add-on, select your label format, and map the spreadsheet columns to label fields.
-
The add-on generates a Google Docs file with all your labels, ready to print.
How to do a mail merge from a spreadsheet?
To do a mail merge from a spreadsheet (like Google Sheets or Excel ):
-
Prepare your spreadsheet → include columns for recipient details (e.g., First Name, Last Name, Email, etc.).
-
Choose your tool:
* In **Google Sheets** : use Gmail’s native mail merge (if your Workspace plan is eligible), an add-on (Mailmeteor, YAMM), or a Chrome extension (GMass).* In **Excel** : use Microsoft Word’s Mail Merge feature (connect Word to your Excel spreadsheet).3. Create your email or document template → insert placeholders matching your column headers.
- Run the merge → each row generates a personalized email or document for the recipient.
Does Google have a mail merge option?
Yes, but only for certain Google Workspace accounts. Gmail now includes a native mail merge feature (multi-send with personalization), but it is available only on eligible plans: Workspace Individual, Business Standard/Plus, Enterprise Standard/Plus, Education Standard/Plus.
Can you do a mail merge from Google Sheets to Google Docs?
Yes. You can use Google Sheets data to automatically generate personalized documents in Google Docs.
The most common way is to use a Google Sheets add-on such as Autocrat. With Autocrat, you:
-
Prepare a Google Sheet with your data (names, emails, custom fields, etc.).
-
Create a Google Docs template with placeholders like <
>. -
Run Autocrat to merge each row of data into the template.
The result is a set of personalized Google Docs or PDFs (one per recipient).
Is Autocrat the best mail merge for Google Docs?
The most popular and effective tool for mail merge with Google Docs is Autocrat.
Autocrat is a Google Sheets add-on that lets you merge data from a spreadsheet into a Google Docs template.It can automatically create personalized documents (Docs or PDFs) and even share them via email.
Other good alternatives include Document Studio or Merge by Quicklution, depending on your needs.
Can you do a mail merge from Google Sheets to Outlook?
Yes, but not directly. Google Sheets does not have a built-in integration with Microsoft Outlook. To achieve this, you have a few options:
-
Export your Google Sheet as an Excel (.xlsx) file, then use Microsoft Word’s Mail Merge with Outlook.
-
Use a third-party tool or service (like Zapier, Mailmeteor for Outlook, or Coupler.io) to connect Google Sheets with Outlook.
-
Convert your data into CSV format , then import it into Outlook’s contacts or mail merge process.
Can you do a mail merge with attachments from Google Sheets?
Yes, with Mail Merge for Gmail. Our add-on allows you to send personalized emails with attachments directly from Google Sheets:
-
In the add-on, expand More options and click the Google Drive™ icon.
-
Select the file you want to attach (document, PDF, image, archive, etc.) from your Google Drive.
-
The attachment will be included in every email sent through your mail merge.
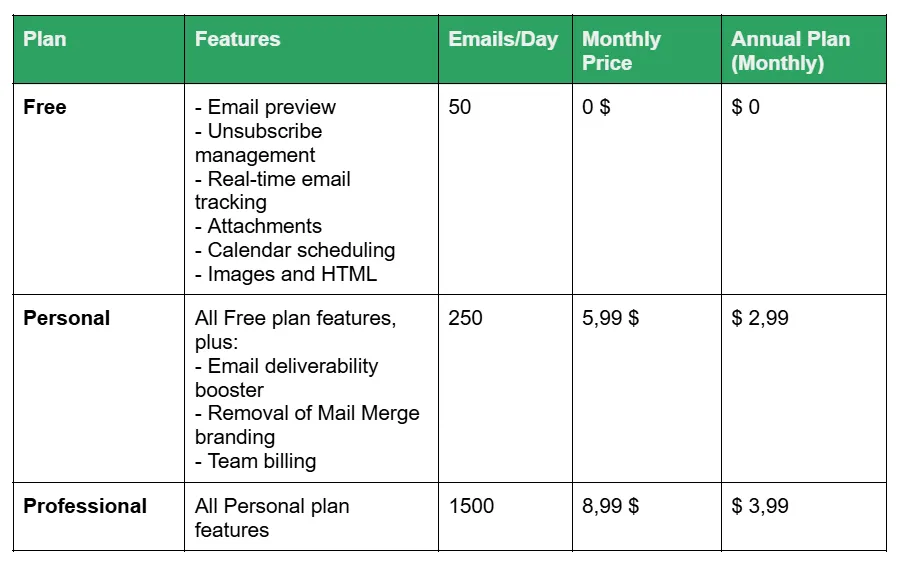
Is there a free Mail Merge for Gmail?
Yes. With Mail Merge for Gmail, you can start for free. The Free plan includes:
-
Up to 50 emails per day.
-
Preview emails before sending.
-
Manage unsubscribes.
-
Real-time email tracking.
Ready to send your first campaign?
Install Mail Merge for Gmail from the Google Workspace Marketplace and send up to 50 personalized emails per day for free.
Install on Google WorkspaceMore reading
More from Tutorials
How to Clean Email List: Your 2026 Guide
Learn how to clean email list with our 2026 guide. Remove bounces & inactive users, run re-engagement campaigns to boost deliverability.
Outgoing Email Servers: A Guide to Better Deliverability
Understand outgoing email servers (SMTP) to fix deliverability issues. This guide explains how they work, common settings, security, and troubleshooting.
How to Whitelist an Email: A Sender's Guide for 2026
Learn how to whitelist an email to stop messages from going to spam. Our guide covers recipient steps and sender best practices for deliverability (SPF/DKIM).