


















Track Email Opens in Gmail
Learn to track email opens in Gmail with clear setup steps, Sheets status updates, troubleshooting tips, and privacy guidance for reliable outreach results.
The most popular advice about tracking email opens in Gmail is also the least reliable: an open does not mean a person read your message. It means an email client requested a tracking image. Gmail has routed external images through Google infrastructure since December 2013, masking the recipient’s device details and changing open tracking from a direct device signal into a proxy-mediated event (Mailbird’s explanation of Gmail image loading).
That distinction matters when you’re sending outreach from Google Sheets. A useful workflow doesn’t discard opens, but it puts them in their proper place beside clicks, replies, unsubscribes, and delivery status. The result is a better question than “Who opened this?” You’re asking, “Which recipients generated enough trustworthy signals to justify my next action?”
Why Gmail Opens Are Not What They Seem
A tracked Gmail open records a render event. The system captures an image request, which says little about whether anyone paid attention. A campaign add-on places a tiny image in the HTML message. When the recipient’s mail client requests it, the request passes through Google’s image proxy and the tracking system logs an event. That event cannot distinguish between a careful read, a quick glance, or an automated fetch that happened before the recipient saw the message.
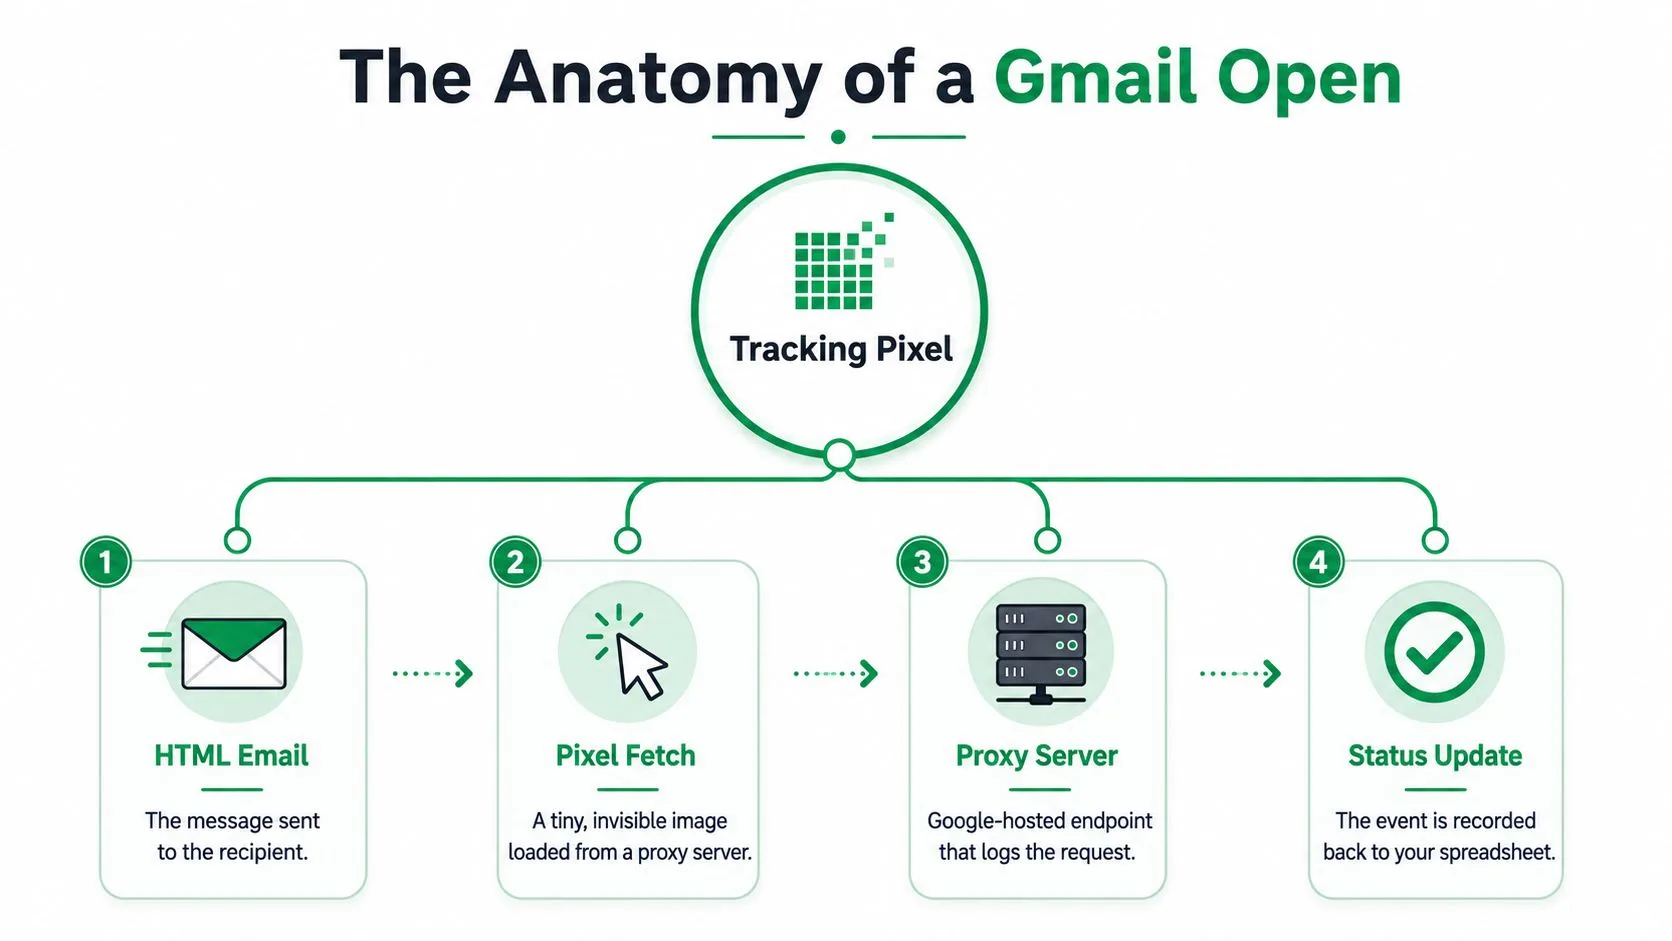
Gmail’s privacy changes kept pixel tracking functional while reducing its precision. Gmail may cache the image after its first fetch, so later views might produce no new request. The tool can associate a requested pixel with a recipient and campaign, but that association does not verify a human read or reveal the recipient’s IP address and device.
Practical rule: Treat an open as “the message rendered at least once,” not “the recipient paid attention.”
A real reader can also disappear from the report by using plain-text view, blocking external images, or reading in an environment that does not fetch the pixel. Apple Mail Privacy Protection introduces a separate source of noise by pre-fetching and caching content through Apple’s infrastructure, producing opens that may not match a person opening the message (Twilio’s explanation of Apple Mail Privacy Protection open events).
Use the open column as one input in a Sheets-based decision process. A click confirms link activity, a reply confirms conversation, and an unsubscribe tells you to stop contacting that person. Compare those outcomes with delivery and suppression status before choosing a follow-up. Check email authentication guidance before scaling, since authentication affects whether messages reach inboxes and whether engagement data is available at all.
Preparing Your Sheet and Installing the Add-On
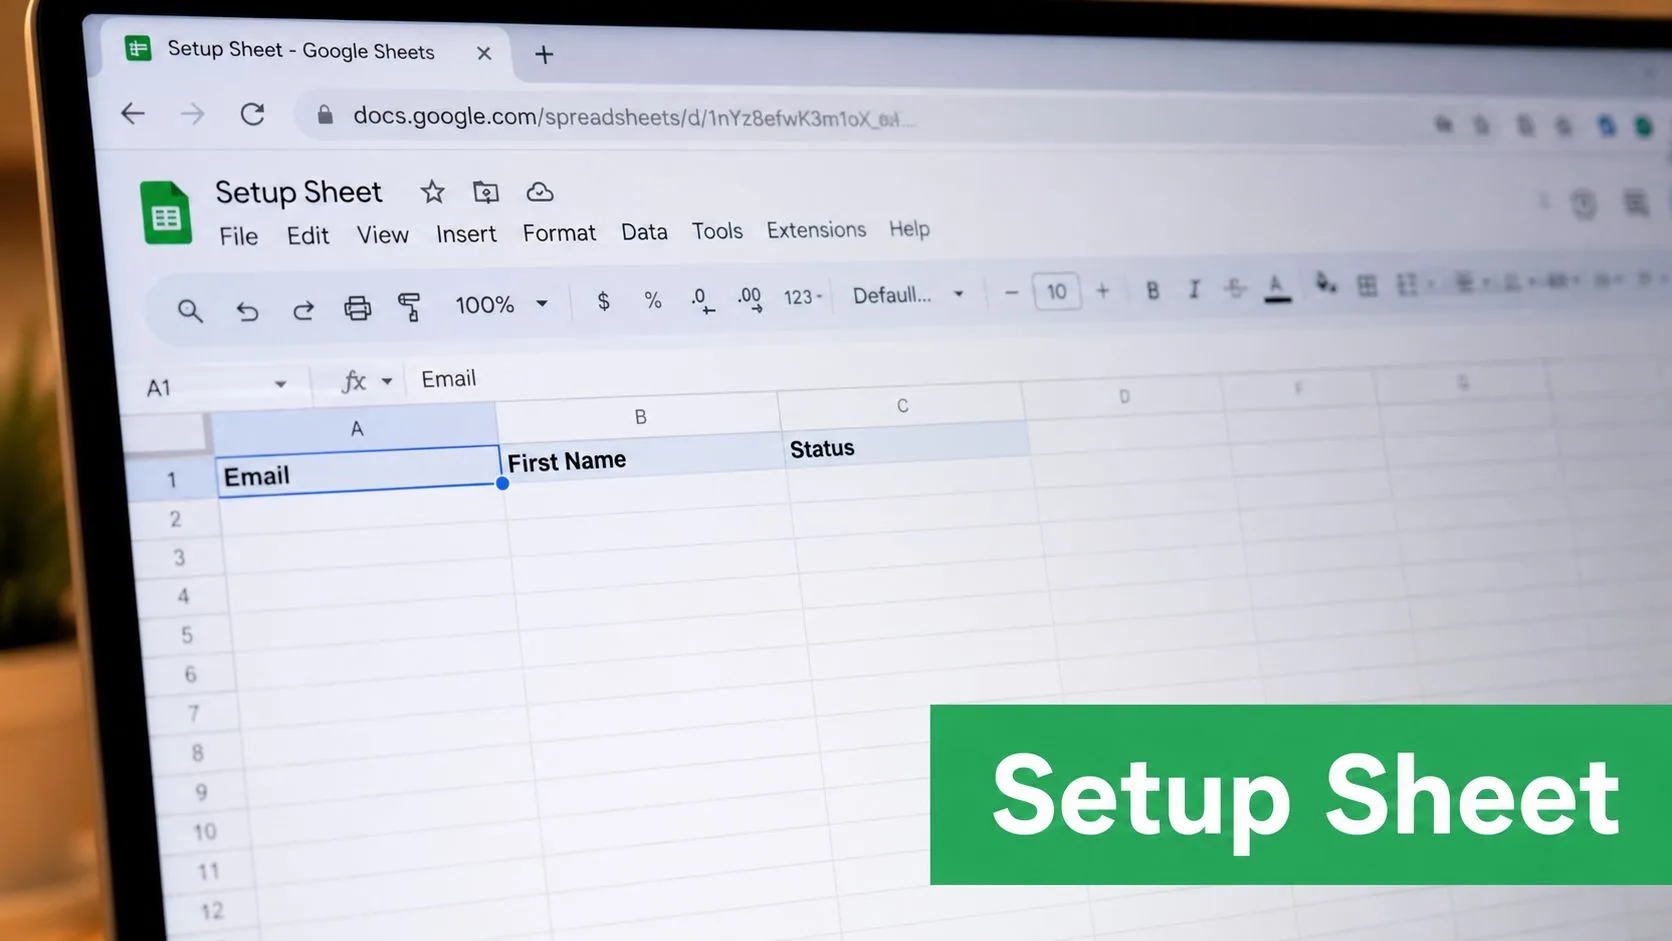
Start with a fresh Google Sheet that has one recipient per row and a clear header row. Keep the operational fields together so the add-on can write status updates without disturbing your personalization data.
A practical starting layout is:
- Email: Use verified addresses rather than guesses or stale exports.
- First Name and Last Name: These support personal greetings and follow-up copy.
- Company: Useful for context, segmentation, and customized subject lines.
- Subject Line: Keep it in the sheet if different recipients need different subjects.
- Status: This records the sending or delivery state.
- Opened, Clicked, Replied, Unsubscribed: Reserve these columns for engagement and suppression events.
Bounced addresses won’t generate meaningful open activity, and leaving them in the audience pollutes your interpretation. If your contacts originate in a form or intake workflow, a resource on how to connect Google Sheets to forms can help you keep collection and campaign data connected.
Install the correct add-on
From the Sheet menu, choose Extensions, then Add-ons, then Get add-ons. Search for Mail Merge for Gmail by digitalinspirations, check that the publisher and product match, and install it. The name is descriptive, so don’t assume that every result mentioning mail merge for Gmail refers to the same product. Confirm you’re installing the specific add-on you intend to use.
Grant the requested Gmail and Drive permissions, then confirm that the add-on appears under Extensions. Restart the Sheet once so the new menu entry loads correctly. This step is easy to skip, but a clean restart can prevent confusion when the sidebar or campaign controls don’t appear.
Finally, create a Gmail draft containing the fields you’ll reuse, such as {{First Name}}. The Sheet supplies the recipient values, while the draft supplies the message structure. Preparing both before enabling tracking gives every campaign a stable destination for status updates.
Turning On Open Tracking in a Campaign
Open the add-on from Extensions and choose Create Campaign. Confirm the Gmail account in the sender field before doing anything else, because the selected account determines the sending identity, reply routing, and the reputation context attached to the campaign.
Choose the prepared Sheet and map the columns to the draft. At minimum, connect Email and First Name, then map any company, subject, or custom fields used in the message. Review the preview carefully. A missing merge value can make a technically successful send look careless.
Before saving the campaign, switch Track Email Opens to On. If the message contains useful destinations, enable link-click tracking as well. Open data tells you that an image rendered. Click data tells you that a recipient activated a link, which is usually a more useful basis for prioritization. Teams comparing Gmail workflows with broader tools to boost outbound sales should make this distinction explicit before evaluating dashboards.
Set the sender name and reply-to address, then choose a realistic daily send cap. A cap that matches your normal Gmail use is less disruptive than an aggressive burst that creates throttling or delivery problems. Keep the campaign’s tracking columns in the same Sheet, because fragmented status data makes follow-up harder.
Test before sending live
Use Send Test Email and send the message to an address you control. Open the test message with images enabled, then check the test row for an entry in the Opened column. The test message should arrive within a minute, and the open event should appear within two minutes of opening it, based on the campaign workflow described here.
An embedded walkthrough can help you locate the campaign controls and tracking settings:
Once the test row shows the expected status, remove it from the live audience or exclude it from reporting. Don’t let your own test become a false positive in campaign analytics. After the live send, Opened, Clicked, Replied, and Unsubscribed events can continue writing back to the recipient’s row as they occur.
Reading Open Status in Sheets and Analytics
The Sheet should work primarily as an action queue. Each recipient row retains contact and personalization fields alongside event statuses, letting you compare an open with a click, reply, or unsubscribe.
An Opened value by itself is a proxy-loaded signal, not verified attention. If Clicked and Replied remain empty, the recipient may have triggered the pixel through an image request, preview, or security scan. Consider a careful follow-up, but give greater priority to a row showing an open followed by a click or reply. The event sequence carries more meaning than one populated cell.
Turn rows into follow-up views
Use filters to create working views:
- Open only: Show populated Opened cells, then exclude anyone who has replied or unsubscribed.
- Clicked but unanswered: Prioritize recipients who clicked and have no reply for a relevant human follow-up.
- Replied: Move these rows into the active conversation workflow and stop automated follow-ups.
- Unsubscribed: Suppress these recipients from future campaigns immediately.
Color cues or icons from the add-on can speed scanning, but verify the underlying status value and timestamp. Filters based on those fields are easier to audit, share, and adjust when the campaign changes.
Campaign-level reporting aggregates opens, clicks, replies, and bounces for comparison across sends. The Sheet remains better for deciding what to do with one recipient. Follow this guide to campaign performance reporting when row-level events need to support a wider review.
Apply a simple decision rule: opens suggest possible attention, clicks suggest interest in the destination, replies show an active conversation, and unsubscribes establish a boundary. A recipient with only an Opened value should remain unconfirmed, regardless of how prominent the status appears in the dashboard. Combine the row with downstream actions before changing priority or starting another message.
Troubleshooting Missing or Inflated Opens
Start with the test-send trap. A campaign owner sends from the same Gmail account that receives the test, opens that message, and creates an Opened status that resembles recipient engagement. Remove or exclude internal test rows, and use a separate account for testing when possible. Keep internal addresses outside the campaign audience.
Zero visible opens can also coexist with successful delivery. A recipient may read in plain text, block images, or receive a message through a corporate gateway that strips remote content. Placement in Gmail’s Promotions tab does not prove tracking failed. If the HTML image never renders, no pixel event can be recorded. Check delivery and reply data first, then test the message from an account with external images enabled.
Diagnose suspicious counts
Inflated counts often come from security scanners or previews across multiple devices. An automated request can reach the tracking image before a person reads the email, while Gmail caching can prevent later views from appearing as new events. Compare open timing with clicks and replies. A burst of opens without downstream activity is weak evidence, so avoid triggering an immediate follow-up sequence from that signal alone.
If statuses never update, inspect the Sheet before editing the campaign. Confirm that the add-on still has access, the original header row remains intact, and the campaign points to the intended spreadsheet. Renaming or removing a tracking column can break the write-back path. Reconnect the campaign to the original Sheet, restore the expected headers, and run a controlled test before sending again.
Diagnostic habit: Change one variable at a time. Test the recipient, image loading, Sheet permissions, and campaign link separately so you know which failure you fixed. Pair the open event with clicks, replies, and unsubscribe status before treating it as evidence of attention.
Limits of Pixel Tracking Across Clients
Pixel tracking records an image request, not a verified read. The recipient’s mail environment must request the remote image, and each client can alter that event. Gmail’s proxy may cache the image and filter request details, so the result reflects a rendering path rather than direct device behavior. Outlook desktop and web may generate events when external images load, but that still does not prove a person read the message.
Apple Mail Privacy Protection pre-fetches and caches content and images through Apple’s servers. It can inflate unique-open reporting while hiding IP address and user-agent details, making those opens weak evidence of individual attention (Twilio’s technical guidance on MPP). Security gateways and antivirus tools introduce another distortion by fetching content before delivery or before the recipient interacts with it.
Mobile Gmail may delay image rendering until a message is opened or scrolled. Image settings can also block the pixel entirely. Before sending an HTML campaign, run CSS checks so layout problems do not create another reason to miss the content.
| Email Client | Pixel Fires | Common Distortion |
|---|---|---|
| Gmail | Usually when Gmail or its proxy fetches the image | Proxy masking, caching, automated loading, and missing repeat views |
| Apple Mail with Mail Privacy Protection | May be pre-fetched through Apple infrastructure | Synthetic opens and anonymized device context |
| Outlook desktop or web | Fires when external images load | Image blocking, enterprise settings, and security filtering |
| Mobile Gmail | Depends on rendering and image settings | Delayed loads or no event when images remain blocked |
| Corporate mail gateway | May fetch before delivery | Automated opens from scanners rather than recipients |
| Plain-text reader | Usually won’t fetch the HTML pixel | Genuine reading remains invisible |
Use the table to set expectations, not fixed reliability scores. For outreach decisions, treat opens as a proxy loaded with client behavior. Pair them with clicks, replies, and unsubscribe status in Sheets before changing follow-up logic. A click or reply shows stronger intent; an open alone mainly shows that some system requested the tracking image.
Tracking Ethically and Closing the Loop
Open tracking should be an opt-in signal, not an invisible default. A privacy-first outreach process discloses tracking when appropriate, includes a clear unsubscribe path, honors suppression requests, and keeps consent records separate from engagement events. Consent to receive an email isn’t automatically the same as consent to monitor how the recipient interacts with it.
Cold outreach deserves extra restraint because the recipient hasn’t necessarily invited behavioral monitoring. Skip open tracking for internal updates, sensitive medical or financial communications, and audiences where the metric is already distorted by privacy protections. In the EU, pixels and tracking links can fall under consent-based tracking requirements, so review your legal basis and retention practices rather than assuming ordinary email permission covers every event (Brevo’s guidance on Apple Mail Privacy Protection and bot activity).
Use engagement data to reduce pressure, not increase it. Route genuine replies to a person, use clicks to tailor a relevant follow-up, drop unengaged contacts after a defined review window, and suppress anyone who unsubscribes. Review opens, clicks, replies, bounces, and unsubscribes together before deciding what happens next.
Keep this checklist beside the Sheet:
- Disclose thoughtfully: Tell recipients when tracking affects the communication.
- Respect choice: Honor unsubscribe and do-not-track requests.
- Validate behavior: Require clicks or replies before treating an open as strong intent.
- Protect sensitive contacts: Disable tracking where privacy risk outweighs operational value.
- Audit the audience: Remove bounced, invalid, and suppressed addresses.
Mail Merge for Gmail lets you send personalized campaigns from Gmail using recipient data in Google Sheets, with tracking fields for events such as opens, clicks, replies, and unsubscribes written back to the Sheet. Visit Mail Merge for Gmail to build a Sheets-native workflow that uses open data carefully and keeps stronger engagement signals in the same campaign view.
Ready to send your first campaign?
Install Mail Merge for Gmail from the Google Workspace Marketplace and send up to 50 personalized emails per day for free.
Get started for freeMore reading
More from Tips

10 Email Campaign Best Practices for Better Results
Use these 10 email campaign best practices to improve targeting, deliverability, engagement, testing, compliance, and conversions with Mail Merge for Gmail.

Best Email Testing Tools: Boost Deliverability in 2026
Discover the top email testing tools to ensure flawless renders and high inbox placement before every send.
Mail Merge Formatting Tips for Gmail Add-on Success
Master mail merge formatting in Gmail with step-by-step data prep, template styling, conditional logic, and troubleshooting to boost deliverability.