DomainKeys Identified Mail Gmail Setup: Boost Deliverability
Improve email deliverability & avoid spam. Learn to set up DKIM for Gmail & Google Workspace. Get your 2026 guide for domainkeys identified mail gmail.
You send a campaign from Gmail, double check the wording, personalize the message, and hit send. Then replies barely come in. A few recipients tell you they found it in spam. Others never saw it at all.
That’s the moment many small business owners start blaming the subject line, the call to action, or the list. Sometimes those things matter. But often the bigger issue sits behind the scenes. Gmail and other mailbox providers want proof that your message came from your domain and wasn’t forged by someone pretending to be you.
That proof is where DomainKeys Identified Mail, or DKIM, comes in. If you’ve been searching for DomainKeys Identified Mail Gmail setup help, the short version is this: DKIM acts like a digital wax seal on your email. It helps Gmail trust your messages, and that trust affects whether your outreach lands in the inbox or gets treated like a risk.
Why Your Emails Land in Spam and How to Fix It
A familiar pattern looks like this. A local agency sends appointment reminders, follow-ups, or outreach from a custom business domain through Gmail. The emails look normal to the sender. But Gmail sees a different question first: can this sender prove the message is legitimate?
If that proof is weak or missing, your email starts the trip with a trust problem. That doesn’t mean your business did anything shady. It means the receiving server has less confidence that the message really came from your domain.
DKIM fixes that trust gap. It adds a digital signature to each outgoing email so receiving servers can verify two things: the message was authorized by your domain, and important parts of the message weren’t altered along the way.
Practical rule: If your emails come from a custom domain, authentication is part of deliverability, not a technical extra.
For many teams, spam placement starts improving only after they handle the basics of authentication correctly. If you’re also tightening up content and sending habits, this guide on how to prevent email from going to spam is a useful companion.
The important shift is mental. Don’t think of DKIM as “IT stuff.” Think of it as your business ID badge for email. Without it, Gmail has to guess. With it, Gmail can verify.
What Is DKIM and Why It Builds Trust
DomainKeys Identified Mail was formally established in 2004 after merging two distinct email security initiatives: enhanced DomainKeys developed by Yahoo and Identified Internet Mail created by Cisco, as described in this DKIM background overview. That merger created a standard way for organizations to claim responsibility for outgoing email by attaching a digital signature tied to their domain.
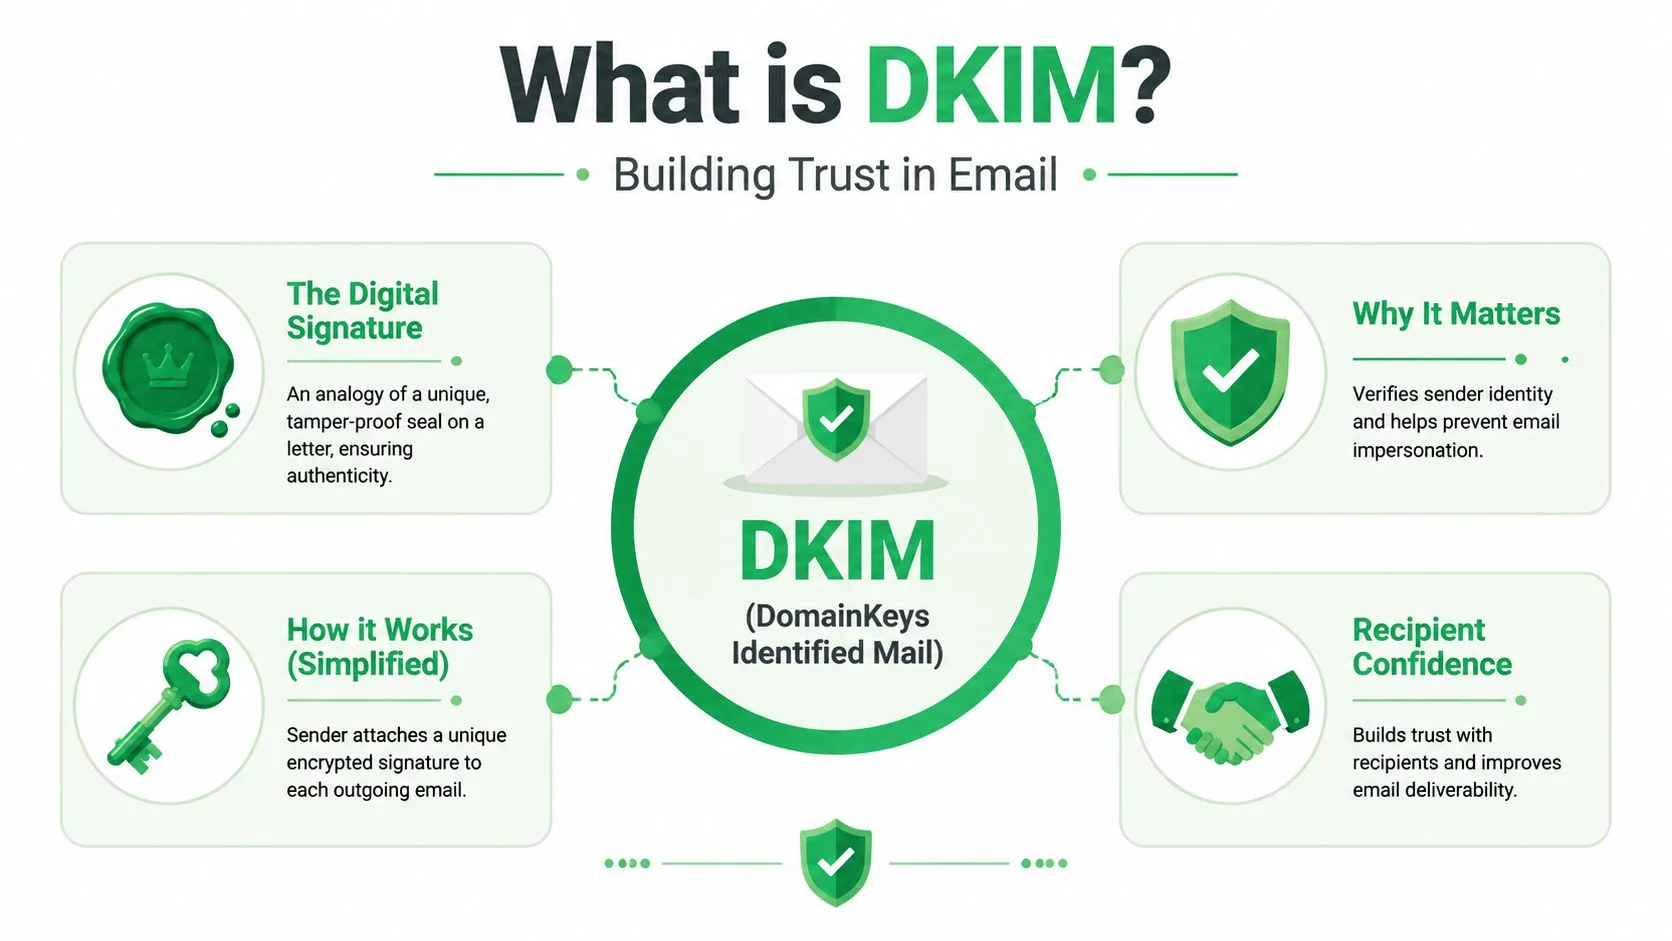
The wax seal analogy
The simplest way to understand DKIM is to picture a paper letter sealed with custom wax. If the seal matches your company’s mark, the recipient knows the letter came from you. If the seal is broken or fake, trust drops immediately.
DKIM works in a similar way.
- Your mail server signs the message using a private cryptographic key.
- Your domain publishes the matching public key in DNS.
- The receiving server checks the signature against that public key.
If the signature checks out, Gmail gets strong evidence that the email was sent with your domain’s authorization and that key parts of the message weren’t tampered with in transit.
What happens behind the scenes
You don’t need to become a cryptographer to use DKIM well. You just need to understand the jobs each part performs.
| Part | What it does | Why it matters |
|---|---|---|
| Private key | Signs outgoing mail on the sending side | Proves the sender had access to the authorized signing key |
| Public key in DNS | Lets receiving servers verify the signature | Makes verification open and standardized |
| DKIM result | Shows whether verification passed | Gives mailbox providers a trust signal |
That last point matters a lot. A receiving system can independently validate your message without special software or a private agreement with your business.
Why trust improves deliverability
Mailbox providers don’t only look at what your message says. They also look at whether your domain behaves like a responsible sender. DKIM helps establish that reputation over time.
It also works best as part of a team with SPF and DMARC. SPF helps identify who’s allowed to send on behalf of your domain. DMARC helps align those checks with the domain your recipient sees in the From address. If you want a plain-English overview of how those pieces fit together, this guide to email authentication basics is worth reading.
A good campaign can still struggle if the receiving server doesn’t trust the sender identity first.
How Gmail Uses and Displays DKIM Verification
Gmail users often assume Google handles everything automatically. That’s only partly true. If you send from a regular @gmail.com address, Google manages the authentication environment for you. If you send from a custom domain in Google Workspace, you need to make sure your domain’s DKIM setup is correct.
Gmail also has specific expectations for delivery to personal Gmail inboxes. To successfully deliver mail to personal Gmail accounts, the sender must implement DKIM with a cryptographic key of at least 1024 bits, and Gmail recommends a 2048-bit key when the domain provider supports it, as explained in Valimail’s summary of Gmail’s requirements.
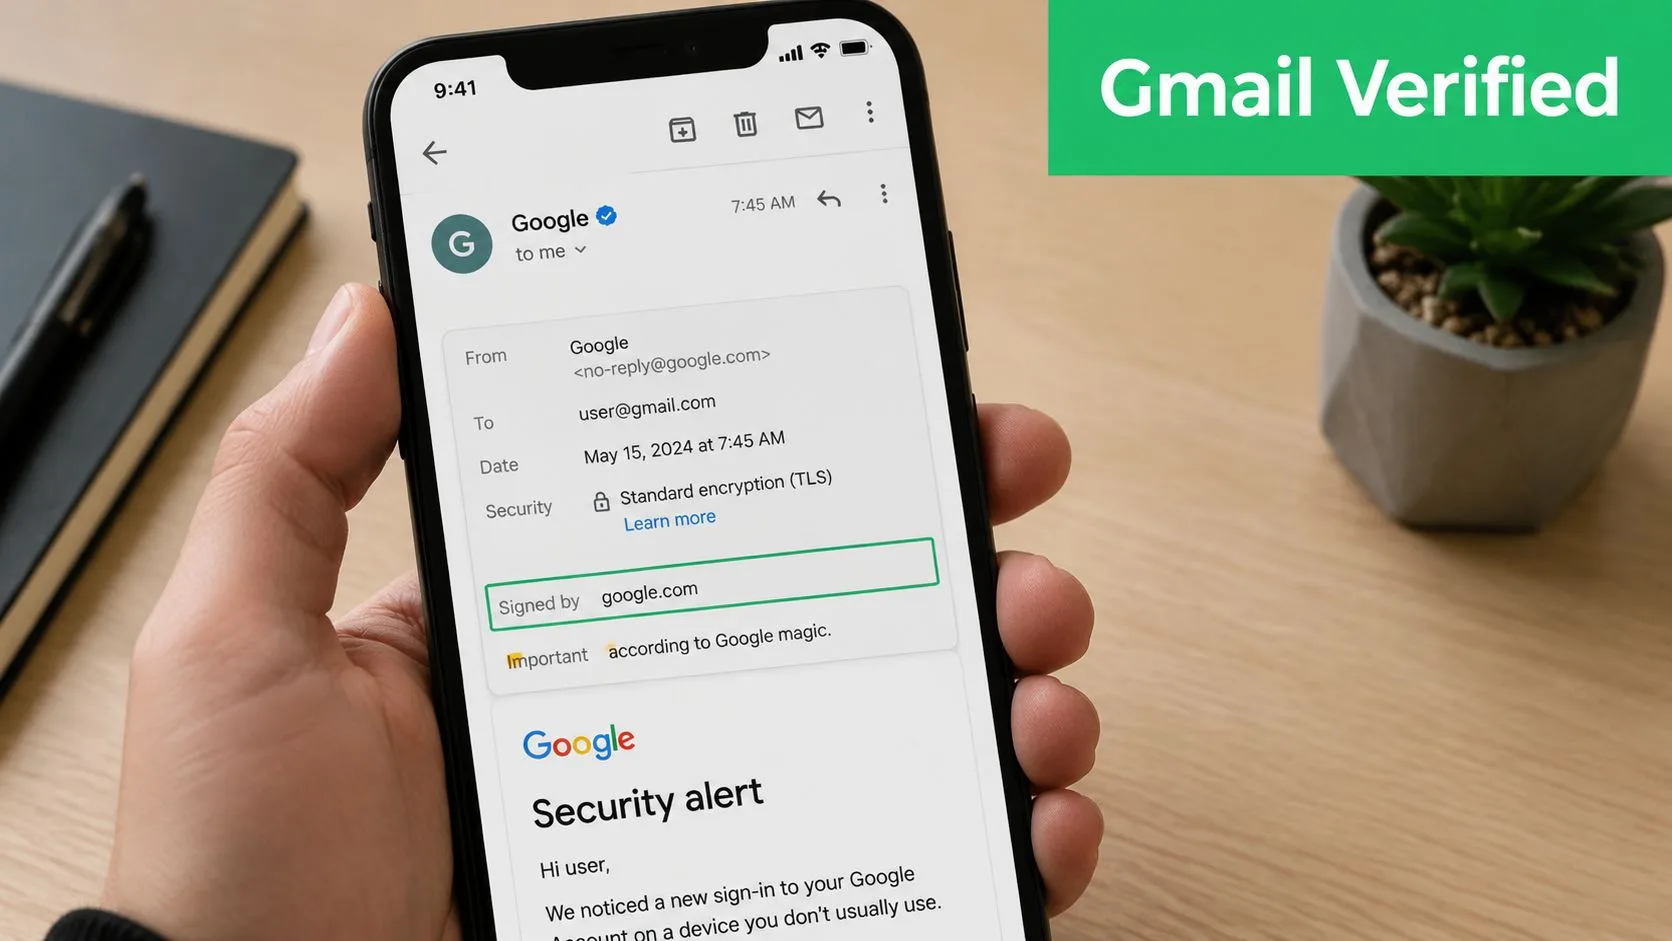
Where to look in Gmail
You don’t have to guess whether DKIM is working. Gmail lets you inspect the original message details.
Use this quick check:
- Open a message in Gmail.
- Click the menu for more options in the message view.
- Choose Show original.
- Look for the Authentication-Results area.
- Check whether you see DKIM=pass or similar confirmation.
When Gmail shows a passing DKIM result, that means the signature verification succeeded for that message.
What a passing result tells you
A DKIM=pass result is not a promise that every future campaign will reach every inbox. Deliverability still depends on content, list quality, sending behavior, and overall domain reputation.
But it does tell you something valuable: Gmail was able to validate the digital signature attached to that message. That’s one of the strongest technical signs that your setup is healthy.
Check this before every major launch: send a test email to another account you control, open the original message, and confirm the authentication result before you scale up.
This short walkthrough can help if you want to see the process visually:
Where people get confused
A few common misunderstandings cause trouble:
- “I’m using Gmail, so DKIM is automatic.” That’s only true for standard Gmail identities. Custom domains in Google Workspace need domain-level setup.
- “If one email passes, everything is done forever.” Not necessarily. Different services sending on your behalf may need their own authentication configuration.
- “The From address is enough.” It isn’t. The visible From field can be spoofed. Authentication gives mailbox providers a way to verify the claim.
If you’re managing outreach from a business domain, checking Gmail headers occasionally is one of the simplest habits you can build.
A Step-By-Step Guide to Setting Up DKIM in Google Workspace
Setting up DKIM in Google Workspace is less mysterious than it sounds. The task is really two connected jobs: generate the signing record in Google Admin, then publish the matching record in your DNS.
Before you touch anything, list every service that sends email using your domain. That includes Google Workspace and any outside platform sending newsletters, follow-ups, receipts, or onboarding messages. Fortinet notes that organizations should first compile all authorized services sending on behalf of their domain and that each domain in Google Workspace needs a unique DKIM key from the Admin Console, as outlined in Fortinet’s DKIM record explainer.
Step 1 through Step 3 in Google Admin
Start inside your Google Workspace admin area and go to Gmail settings for the domain you want to authenticate. Look for the email authentication option where Google lets you generate a DKIM record.
A typical flow looks like this:
- Choose the domain you want to authenticate if your account manages more than one.
- Generate a new DKIM record in the Admin Console.
- Copy the selector and TXT value that Google provides.
The selector is the label that helps receiving servers know which public key to look up. Google often presents this in a form related to a host name such as a selector under _domainkey.
Step 4 through Step 5 in DNS
Next, go to the DNS manager where your domain is hosted. That might be your registrar or a separate DNS provider.
Add the DKIM record using the details from Google:
- Host or name field should match the selector Google gives you.
- Record type should match what your provider expects for the Google-generated DKIM entry.
- Value field should contain the public key information exactly as provided.
Small mistakes matter here. One missing character, a pasted extra space, or publishing the record under the wrong domain can stop verification.
When you paste a DKIM record into DNS, treat it like an account number. Don’t reformat it, don’t shorten it, and don’t assume your DNS host will “fix” it for you.
What to watch before you turn it on
This is the part many guides rush through. Google states that DKIM keys may become available only after 24 to 72 hours following enablement in the Admin Console. That delay matters in real life because DNS changes need time to spread across different systems.
Here’s the practical meaning for a small business owner:
| Stage | What you see | What you should do |
|---|---|---|
| Right after publishing | Record may exist in your DNS panel but not be visible everywhere yet | Wait and avoid big sends |
| During propagation | Some receiving systems may not verify the record reliably | Test only, or keep volume low |
| After propagation completes | Verification becomes consistent | Start normal sending |
The safest launch sequence
If you’ve just added DKIM for a domain used in Gmail outreach, use this approach:
- Day one behavior: publish the record and hold off on important campaigns.
- Test gently: send a few internal checks and inspect the message headers.
- Confirm authentication: make sure verification is visible before larger outreach.
- Only then scale: launch the campaign once the setup is stable.
That pause can feel annoying, especially if you’re trying to hit a deadline. But waiting is usually cheaper than sending a whole campaign during an authentication gap.
Troubleshooting Common DKIM Failures and Errors
DKIM problems usually aren’t dramatic. They’re small mismatches that subtly undermine deliverability. A selector doesn’t match. A DNS record was pasted into the wrong place. A third-party tool sends mail from your domain without using the same authentication path you expected.
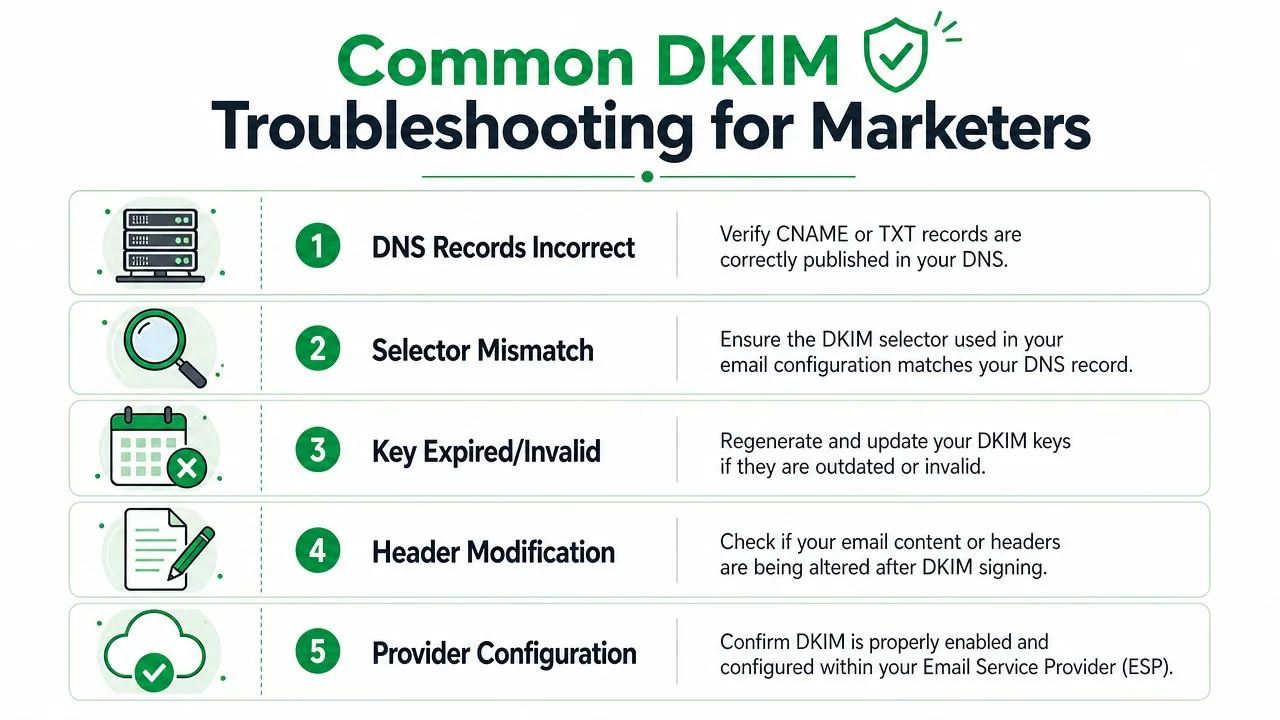
The failures that show up most often
Start with the simplest checks first.
- DNS record issue: the record may be incomplete, saved under the wrong host, or not published correctly.
- Selector mismatch: the selector used by the sending system may not match the selector that exists in DNS.
- Message changed after signing: if another system modifies headers or content after the DKIM signature is applied, verification can fail.
- Wrong sending path: one service may be signing properly while another service using the same domain is not.
A useful rule is to test the exact path your real campaign uses. If your messages are sent one way during testing and another way during launch, the result can change.
The 24 to 72 hour propagation gap
One of the least discussed problems is the 24 to 72 hour blackout window after enabling DKIM. Google explicitly states that keys can take 24 to 72 hours to become available, and marketers often launch mail merge campaigns during that period, which can cause messages to be treated as unauthenticated and pushed toward spam.
That’s why “I added the record this morning” isn’t the same as “my whole sending environment now recognizes the record.”
Don’t schedule a cold outreach push right after DKIM setup. Use the waiting window for testing, list cleanup, and template review.
A troubleshooting checklist that saves time
If DKIM isn’t passing, work down this list:
- Open a sent email in Gmail and inspect the original headers.
- Check the selector name against the record published in DNS.
- Confirm the message came from the service you intended rather than a forwarded or alternate route.
- Look for content handling issues if another platform edits the message after signing.
- Wait out propagation before deciding the setup failed.
There’s also an architecture problem that trips up older setups. With legacy G Suite forwarding to a separate Gmail.com account, DKIM can fail because the server doing the forwarding and the server doing the final sending aren’t the same. In plain terms, the signature path gets broken or mismatched. If that’s your setup, the cleanest fix is usually to send directly from the authenticated environment instead of relying on forwarding.
Boost Your Campaign Deliverability with Mail Merge for Gmail
Email outreach works best when the technical foundation and the campaign workflow support each other. DKIM is part of that foundation. It helps Gmail trust your domain. That trust gives your campaign a fair chance to be judged on relevance and quality instead of getting sidelined as suspicious.
This matters even more when you use mail merge tools for sales outreach, customer updates, recruiting, or event reminders. These campaigns often involve many personalized messages sent from the same domain in a short window. If authentication is shaky, you create friction before the recipient even sees your copy.
For Google Workspace users, that sending capacity can be meaningful. Google Workspace accounts with Gmail mail merge enabled can send up to 1,500 recipients per day, including one message to 1,000 recipients and a second message to 500 recipients within the same daily limit, according to this discussion of Gmail mail merge sending limits.
Why authentication matters before scale
If you plan to send personalized outreach at that level, don’t treat DKIM as a box to tick after launch. Treat it like preflight. You want your sending domain ready before volume increases.
That’s especially true because Gmail’s built-in mail merge has some practical limits. Access isn’t available on some of the most popular Google Workspace plans, and the native feature also treats each send as a one-off campaign that can’t easily be reused the next day. Teams weighing those tradeoffs often also spend time choosing the right email marketing solution so their workflow matches their outreach style.
What good setup enables
When DKIM, SPF, and DMARC are aligned, your campaigns start from a stronger position. Then your personalization, timing, and follow-up strategy can do their job.
That’s where a structured sequence matters. If you’re planning outreach beyond a single email, this guide to drip email campaigns is a useful next step because deliverability and sequence design work better together than separately.
A few habits make a real difference:
- Authenticate first: confirm your domain setup before any major send.
- Test the actual workflow: use the same Gmail account, domain, and sending path you’ll use for production.
- Avoid the propagation window: don’t launch during the early DKIM blackout period.
- Build consistency: keep your sending identity stable so mailbox providers can recognize your domain as legitimate.
One caution if you’re researching tools online. Be careful with the phrase Mail Merge for Gmail because it’s descriptive and easy to confuse with competing tools for Gmail-based mass email. When you evaluate product information, double check that the content specifically refers to that exact product and not a different mail merge app with a similar name.
DKIM won’t rescue a weak campaign. But it removes one of the most common technical reasons a good campaign gets ignored by inbox providers.
If you want a simpler way to send personalized campaigns from Gmail after your authentication is in place, Mail Merge for Gmail lets you build, send, track, and manage outreach directly from Google Workspace using data from Google Sheets.
Ready to send your first campaign?
Install Mail Merge for Gmail from the Google Workspace Marketplace and send up to 50 personalized emails per day for free.
Install on Google WorkspaceMore reading
More from Guides

Dynamic Email Content: Boost Engagement in 2026
Learn what dynamic email content is & how to use it to boost engagement. Our 2026 guide covers techniques, best practices, & Mail Merge for Gmail.
Why Is My Mail Merge Not Working? Gmail Fixes
Why is my mail merge not working - Struggling with why your mail merge isn't working in Gmail? This 2026 guide resolves common Mail Merge for Gmail add-on
Contact Database Management: A Practical Guide for 2026
Learn effective contact database management with our practical guide. We cover hygiene, segmentation, and how to use Google Sheets to build a powerful system.